To change transmission fluid, start by locating the transmission pan and draining the old fluid. Replace the filter, if necessary, then refill with new fluid according to manufacturer specifications.
Maintaining a vehicle requires regular attention to its critical components, and among these, the transmission system is pivotal. Its smooth operation hinges on clean and sufficient transmission fluid, which deteriorates over time and use.
As the fluid ages, it can amass debris and lose viscosity, leading to less efficient gear shifts and potentially expensive transmission damage.
Regular fluid changes are therefore essential to vehicle health and performance. Car enthusiasts and DIY mechanics often undertake this task to ensure their transmission runs seamlessly.
Before embarking on this maintenance job, consult your vehicle’s manual for the recommended type and amount of fluid, as well as the suggested service interval, to keep your ride in optimal shape.
Recognizing The Need For Change
Keeping your vehicle in top condition means paying attention to all parts, especially the transmission. Regular maintenance is key to a long-lasting transmission. Knowing when to change the transmission fluid is crucial.
Signs Of Aged Transmission Fluid
Spotting the telltale signs of old transmission fluid can save you from costly repairs. Be vigilant and watch for these changes:
- Odd noises: Listen for unusual sounds when changing gears.
- Grinding gears: Feeling resistance or noise while shifting indicates an issue.
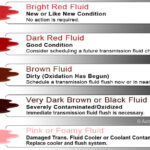
- Color change: Clean fluid is bright red. Darker fluid needs attention.
- Burning smell: An acrid odor suggests the fluid is breaking down.
- Slipping gears: If the vehicle struggles to stay in gear, check the fluid.
Mileage Markers For Maintenance
Vehicles have specific maintenance schedules, including transmission fluid changes. Here are some mileage markers to keep in mind:
| Mileage | Maintenance Action |
|---|---|
| 30,000 to 60,000 miles | First check recommended by many manufacturers. |
| 60,000 to 100,000 miles | Review vehicle manual for specific intervals. |
| 100,000+ miles | Consider more frequent checks with high mileage. |
Gathering The Right Tools And Materials
Embarking on a DIY journey to change your transmission fluid requires preparation. Essential to this process is gathering the right tools and materials. With the perfect setup, your vehicle will be running smoothly in no time.
Choosing Quality Transmission Fluid
Selecting the best transmission fluid is critical for your car’s health. It ensures gears shift seamlessly and the system stays lubricated. Check your vehicle’s manual for the recommended type. You want fluid that matches manufacturer specifications.
Decide between synthetic or conventional based on your car’s needs and budget. High-quality fluid promotes longevity and optimal performance, so don’t compromise on quality.
Tool Checklist Before You Start
Before diving into the task, it’s vital to have a complete set of tools at your disposal. Here’s a straightforward checklist to ensure you are fully equipped:
- Transmission fluid – Specific to your vehicle
- Drain pan – To catch the old fluid
- Funnel – For adding new fluid without spills
- Socket set – Required for opening the drain plug
- Torque wrench – To tighten the pan bolts accurately
- Jacks and jack stands – To raise and secure the vehicle
- Gloves and safety glasses – For personal protection
- Clean rags – To wipe any spills or mess
Ensure you have these items within reach for a smooth and efficient operation. Suitable tools lead to successful outcomes. Stay prepared and organized to tackle the fluid change with confidence.
Preparing Your Workspace
Preparing Your Workspace is crucial when planning to change your transmission fluid. A well-prepared space ensures safety and prevents environmental damage. This guide provides easy-to-follow steps to get your workspace ready.
Safety Measures
- Wear protective gear: Gloves and safety glasses are a must. This protection keeps hands and eyes safe from fluid splashes.
- Keep a fire extinguisher close: Transmission fluid is flammable. Be prepared for any unexpected fires.
- Well-ventilated area: Work outdoors or in an open garage. Fumes from the fluid can be harmful if inhaled in enclosed spaces.
- Have the right tools: Gather all tools before starting. This avoids leaving the workspace with a disabled vehicle.
Environmental Considerations
Protect the environment by preventing spills. Use a drain pan to catch old fluid. Dispose of old transmission fluid at a recycling center. Never pour it down the drain or onto the ground. It’s both illegal and harmful to nature.
Vehicle Positioning For Optimal Access
- Lift the vehicle securely: Use a jack and jack stands or ramps. Reliable equipment is vital for under-vehicle safety.
- Ensure level ground: Work on a flat surface. This positioning keeps the vehicle stable while lifted.
- Chock the wheels: Place wheel chocks around the wheels on the ground. This prevents the vehicle from rolling.
- Check for comfort: Move around underneath easily. Make sure there is enough space to work comfortably.
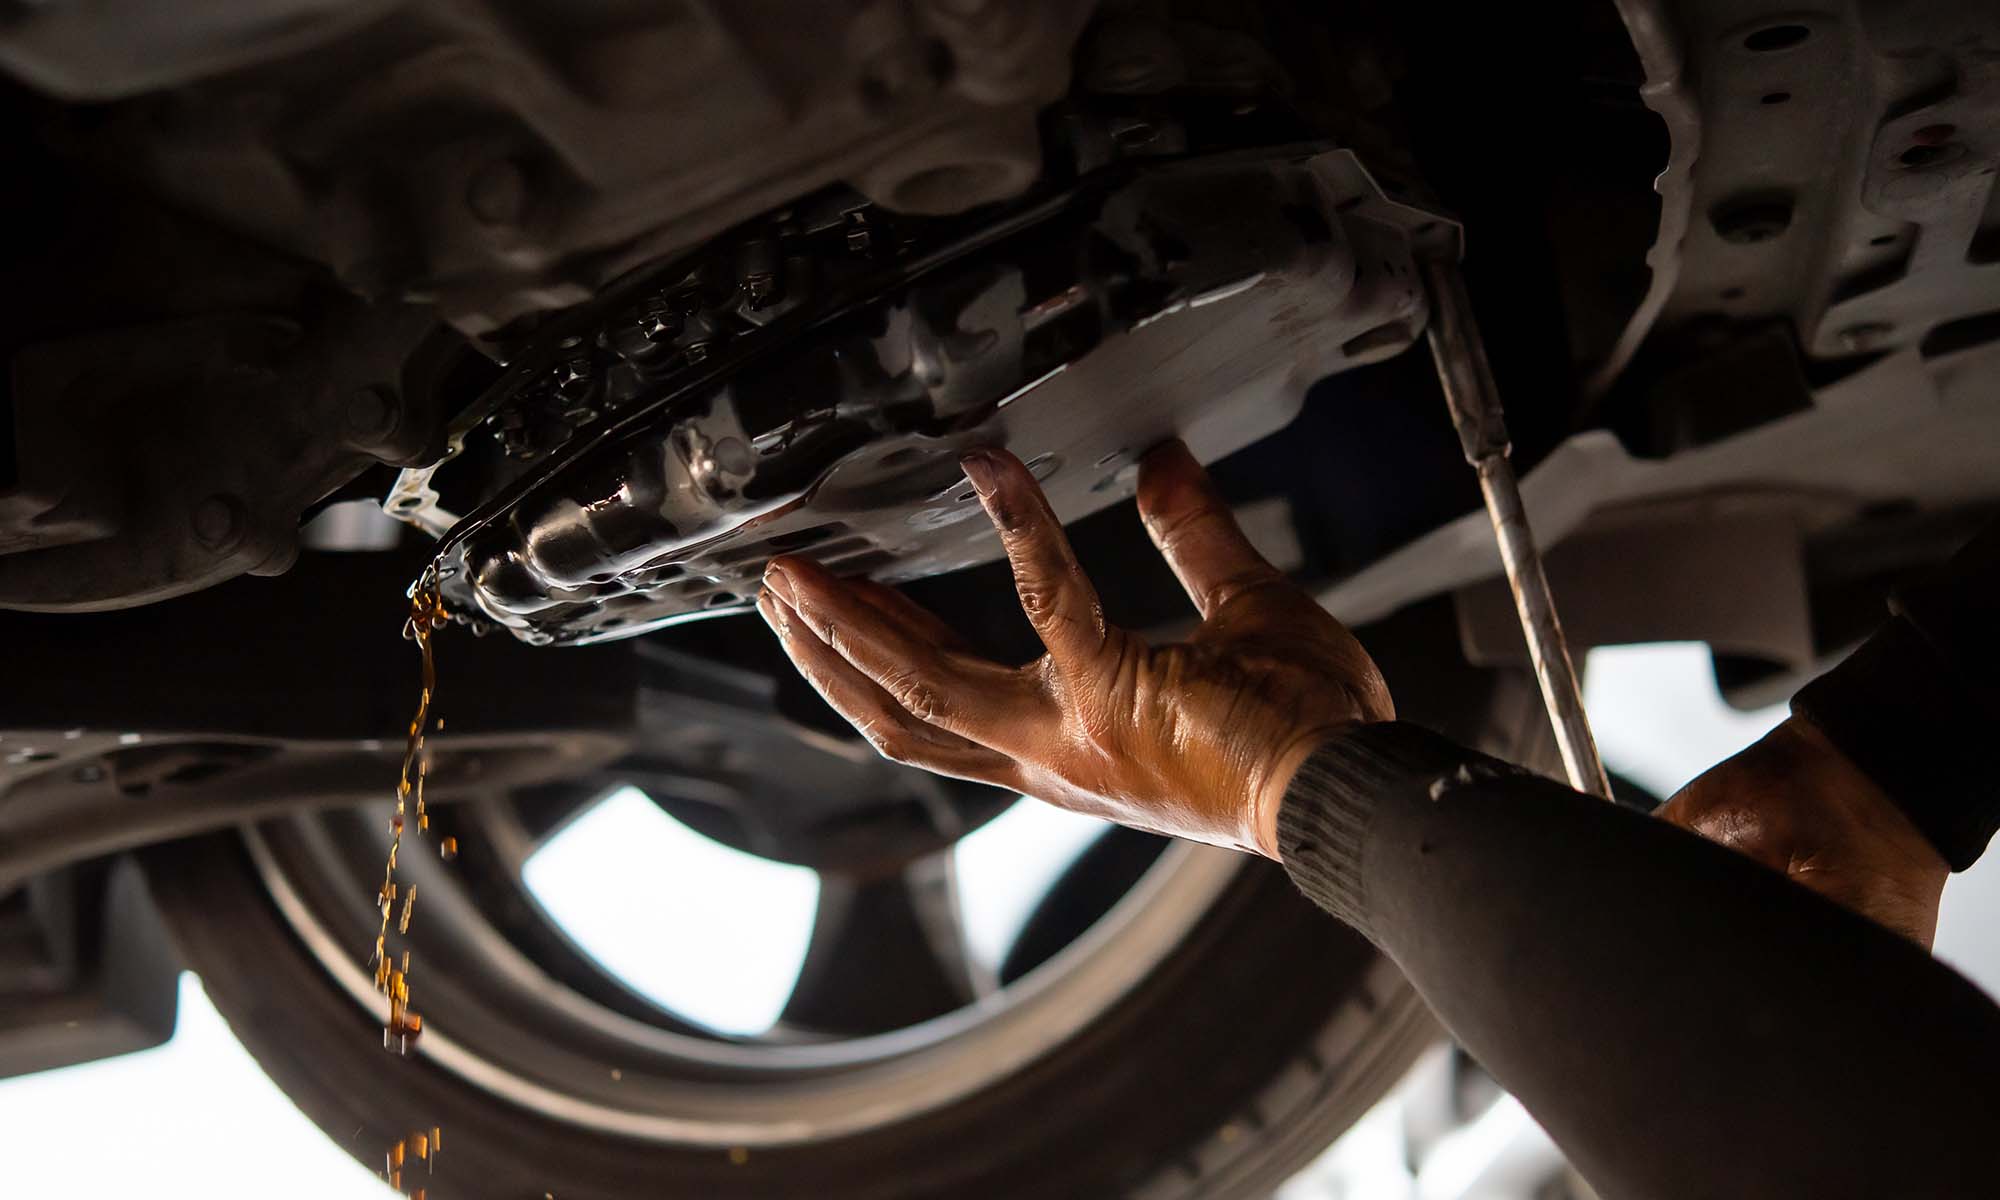
Draining The Old Fluid
Draining the old fluid is a crucial step in changing your transmission fluid. It removes debris and old fluid. This helps your car run smoother. This guide walks you through the process.
Locating The Transmission Fluid Pan
Your first task is to find the transmission fluid pan. It’s typically located beneath your car, near the engine’s rear. Look for a large, flat pan with a bolt on it.
This bolt is the drain plug. Use the car manual to help you identify it. Ensure you park on a level surface and engage the parking brake.
Steps For Clean And Efficient Draining
- Gather the right tools: You’ll need gloves, a wrench, a drain pan, and new transmission fluid.
- Prepare your workspace: Lay down cardboard or a tarp to catch spills.
- Remove the drain plug: Place the drain pan under the fluid pan and use the wrench to remove the bolt.
- Let the fluid drain: Wait until the fluid stops dripping. It may take some time.
- Clean the drain plug: Remove any metal filings with a rag. These filings can cause harm if left in the system.
- Replace the drain plug and refill: Once drained, screw the drain plug back in and refill with new fluid.
Cleaning And Examining The Pan
The pan holds the transmission fluid and catches debris over time. It requires a thorough clean and a detailed inspection to ensure your transmission runs smoothly. Follow these steps for an effective process.
Removing Grime and Contaminants
Removing Grime And Contaminants
Begin by draining the fluid into a clean bucket. Take out the pan gently. Put on gloves for the cleaning part.
Use a degreaser spray on the pan. Let it soak for a few minutes. Scrub off the grime with a brush. Reach into every corner.
- Wipe the pan with a clean rag.
- Don’t forget the magnet inside the pan. It catches metal filings.
- Clean it separately.
Inspecting for Wear and Damage
Inspecting For Wear And Damage
After the pan is clean, search for any signs of damage. Look for:
| What to Look For | Signs of Trouble |
|---|---|
| Small Pieces of Metal | Ominous sign; indicates internal wear. |
| Excess Debris | Points to wearing gears or clutch material. |
| Cracks or Holes | Could lead to leaks; must fix immediately. |
Inspect the gasket surface. Ensure it’s smooth for a tight seal. Replace if needed.
Replacing The Filter
Replacing the transmission filter is a key step in changing your vehicle’s transmission fluid. A clean filter helps keep the fluid free of debris, ensuring smooth gear shifts. When the filter becomes dirty or clogged, it’s time for a replacement.
Determining The Filter Type
Before you begin, identify the correct filter for your vehicle. Check the owner’s manual or consult with a professional.
- Some vehicles have a metal screen that is cleanable;
- Others require a complete filter replacement.
Process Of Filter Removal And Installation
Removing the old filter requires care:
- Locate the transmission pan beneath the vehicle;
- Drain the fluid into a suitable container;
- Unscrew the pan and remove it;
- Take out the old filter gently.
Installing the new filter is just as important:
- Line up the new filter correctly;
- Secure it in place without overtightening;
- Replace the gasket if provided or required;
- Screw the pan back and fill with fresh fluid.
Each step is crucial to maintain performance.
Refilling With New Transmission Fluid
Refilling a transmission with new fluid is crucial to your vehicle’s health. The process is not just about pouring fluid in. Proper steps ensure your transmission operates smoothly.
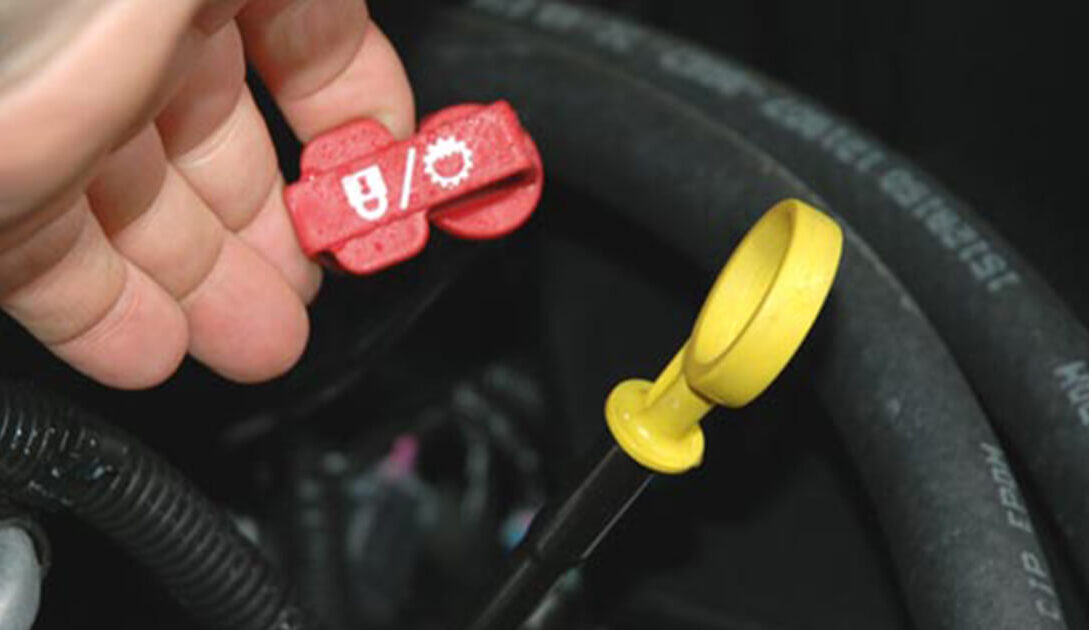
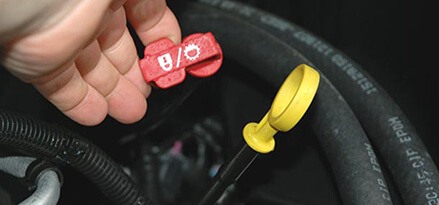
Finding The Fill Port
Before refilling, locate the fill port. It’s different for every vehicle. Check the owner’s manual to find it. It’s often labeled and topped with a bolt or cap. Clean around the port before opening to avoid contamination.
Tips For Avoiding Overfilling
- Check fluid type: Consult the manual for the correct fluid.
- Measure accurately: Use a funnel and metered container.
- Fill in stages: Add fluid slowly, checking levels often.
- Use dipstick: If equipped, check with the dipstick after each addition.
- Monitor temperature: Some vehicles require a specific operating temperature for accurate fluid level checks.
When filling, start your engine. Shift through gears to circulate fluid. Re-check the level, and adjust as needed. A well-filled transmission avoids future problems and costly repairs.
Credit: www.endurancewarranty.com
Final Steps And Checks
Once you’ve drained the old transmission fluid and replaced the filter, it’s vital to complete the process correctly to ensure your vehicle runs smoothly.
The final steps and checks are crucial for the longevity and performance of your transmission. Let’s dive into these final actions to wrap up the fluid change.
Ensuring Tight Seals And No Leaks
A successful transmission fluid change hinges on preventing leaks. After installing the new filter and securing the transmission pan, you must double-check every bolt and gasket. The bolts should be tightened to the manufacturer’s specifications.
Always cross-check as follows:
- Inspect around the transmission pan for gaps.
- Look for any signs of drips or wet spots.
- Ensure the gasket aligns perfectly and is free from damage.
Take your vehicle on a short drive, then reinspect. Check under the car for any telltale signs of leakage.
Quality Control After The Change
Quality control involves verifying that the change was successful and the transmission operates correctly.
Follow these steps:
- Refill the transmission with the proper type and amount of fluid.
- Remove air by cycling through all gears with the engine running.
- Check fluid level with a dipstick.
The fluid level should sit between the ‘full’ and ‘add’ marks. It should be a bright red color and free from debris.
Always review the vehicle’s manual, as some models may have specific instructions.
Remember these tips:
| Tip | Description |
|---|---|
| Check at Operating Temperature | The transmission should be warm before checking levels. |
| Confirm Proper Fluid | Refer to your vehicle’s manual to ensure the correct fluid is used. |
With the above steps, your transmission fluid change is complete. Proper maintenance ensures your vehicle’s transmission runs smoothly for miles to come.
Proper Disposal Of Old Fluid
Changing transmission fluid is key for a smooth-running car. But what about the old fluid? You can’t just pour it down the drain.
Proper disposal is a must for our planet’s health. Let’s explore the right steps to keep our environment clean.
Environmental Tips For Disposal
Safeguarding nature starts with how we handle waste. Here are eco-friendly tips:
- Capture all old fluid in a sealed container.
- Avoid spills – they harm soil and water.
- Never mix fluids. Different types can’t be recycled together.
- Label the container clearly for safety.
Locations That Accept Used Transmission Fluid
Could a local spot take your old fluid? Many locations do! Check these out:
| Location Type | Details |
|---|---|
| Auto Shops | Most shops will recycle the fluid for you. |
| Recycling Centers | They handle various automotive fluids. |
| Hazardous Waste Events | These events collect and dispose of such waste safely. |
| Service Stations | Some stations offer disposal service. |
Call ahead to confirm. Some locations may charge a small fee.

Credit: www.youtube.com
Maintenance Records And Future Planning
Keeping a track of your vehicle’s service history is essential. Proper records make it easier to plan future maintenance. They help keep your vehicle running smoothly.
With each transmission fluid change, documenting details ensures long-term performance. Let’s discuss how best to record service dates and set reminders for future changes.
Recording The Service Date And Details
Documenting each service session is crucial. After changing your transmission fluid, note the date and any additional work done. Keep this information in a safe place.
Whether in a dedicated logbook or a digital record, organize the details for easy reference. A detailed record should include:
- Type of fluid used
- Amount of fluid replaced
- Service location and mechanic
- Vehicle’s mileage at the time of service
- Any observed issues or recommendations
Add more rows as necessary
| Date | Mileage | Fluid Type | Quantity | Service Provider |
|---|---|---|---|---|
| MM/DD/YYYY | 000,000 miles | Full-Synthetic ATF | 4 Liters | XYZ Auto Shop |
Setting A Reminder For The Next Change
Stay ahead of vehicle maintenance with scheduled reminders. Timely fluid changes are vital for your car’s longevity. Check your vehicle manual for the recommended interval. Use digital tools like:
- Calendar apps with automatic alerts
- Car maintenance apps designed for service tracking
- Email reminders set for future dates
Physical reminders work too. Place a sticker on your windshield with the next service date. Mark a calendar in your garage. By setting multiple reminders, you’ll ensure your car gets the attention it needs.
Remember, consistency in vehicle care pays off in performance and reliability.
Credit: www.mobil.com
Frequently Asked Questions
Can I Change Transmission Fluid Myself?
Yes, you can change transmission fluid yourself by following the vehicle’s manual, ensuring safety, using the right tools, disposing of fluid properly, and checking for leaks afterward.
How Much Should A Transmission Fluid Change Cost?
A transmission fluid change typically costs between $80 and $250. Prices vary depending on vehicle make and model, as well as the service provider.
Should I Flush Or Change Transmission Fluid?
Yes, periodically flushing or changing transmission fluid is essential to maintain vehicle performance and prevent costly repairs. Always consult your vehicle’s maintenance schedule for guidance on timing.
How Do You Know If Your Transmission Fluid Needs To Be Changed?
Check your transmission fluid’s color and smell; dark or burnt-smelling fluid indicates a change is needed.
Notice shifting difficulties or unusual noises, as these may also signal the need for fresh fluid. Refer to your vehicle’s manual for recommended change intervals.
Conclusion
Changing your vehicle’s transmission fluid is crucial for its longevity and performance. By following the steps outlined, you’re taking an important step in vehicle maintenance.
Don’t overlook this task to ensure seamless gear shifts and a healthier transmission. Remember, regular upkeep means fewer issues down the road.
Stay on top of your car care game!

Sudatta is a passionate automotive enthusiast and expert in the field. With a keen eye for detail and a love for all things automotive, he shares insightful articles and reviews to ignite the automotive passion in readers.